OK, Kampers!!!
No more cliffhangers.
Today I will take you through the process of how I made these two similar yet different footstools work together.

To remind you, this is how they looked when my niece Miriam bought them.
Or, I may have bought them, I don't remember, it was a lot of high finance.
The one on the right was $35.00.

There was a 1.5" difference in height.
First I stripped them down, taking pictures as I went.
Remember?????
I explained that it's important to document the stripping process, as it will help you when it's time to reupholster the piece.
If you don't know what to do, you can refer to the pictures of how the previous guy covered it.

The corner had been hand sewn.
I wouldn't have thought to do that, but it made the whole process a lot easier to get a good fit for the fabric cover.
As I started ripping out the stitches, I noticed how they had been sewn, so I had a clue how to do it later.

Once the stitches were out, I saw that the fabric on the side of the ottoman had been stapled to the frame, before it had been hand stitched.
This was an obvious way to do it, but once again, I didn't have to figure it out for myself, as I made a note of how it had been done,
Why think, when you don't have to?????

Once I had released the side, it was time to tackle the bottom.
I pulled out all the staples, revealing the wooden frame.
When I strip a piece that had been redone since it was originally made, I often find a @#$ load of nails and staples left over from a previous job.
Lots of folks, when they reupholster a piece, don't remove all of the existing nails and tacks and staples.
I am very particular about cleaning the wood of all unnecessary metal.

There was a base of woven webbing.I tried to convince myself that it was just fine and dandy!!!!
(It wasn't....)
(It was sagging.....)
(Kinda like meeeeee.......)

So,
I removed it like the good little DIYer that I am.
So,it was all clean and ready to be rejuvenated!!!!!

Next, it was time to strip the second ottoman.
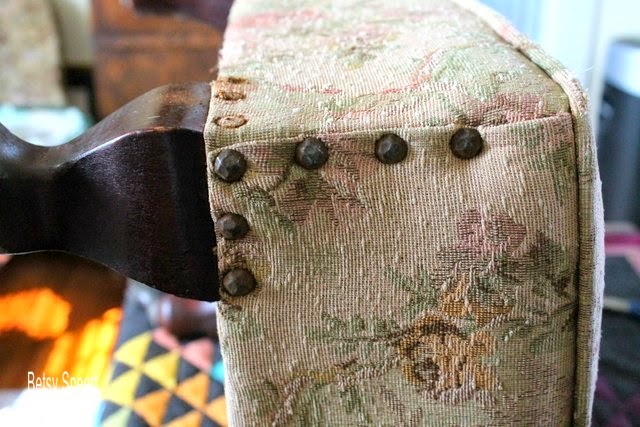
This one had nail heads up the sewn corners, rather than hand stitching,
I thought about which way I wanted to go, long and hard,
and settled on the hand stitching look.
This is the stuff that came out of the shorter ottoman, it had a wood platform top.
The straw was really disgusting.
I tried not to breath.
FYI.....
It's hard to live without breathing.

So, this is what was under all that crap.
The original furniture company that manufactured it was very thrifty, and made the top out of two pieces of scrap. They must have used every piece they had, it was probably during the depression.

This is the stuff that came out of the taller one, not so bad as the other.

Sooooo
here they are side by side, you can really see the difference in height here.

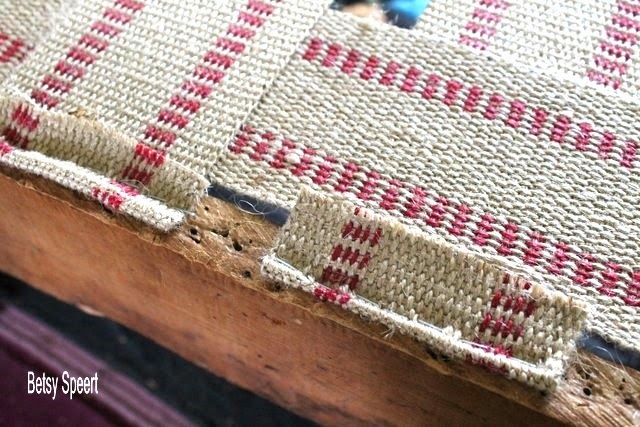
Since the webbing had been all saggy, it was time to install some new taught support.
It's always good to have a roll of webbing in your closet!!!!!

And a webbing pulling tool.

First thing is to staple one end to the frame.
Staple all the way across the webbing.

Then get your webbing pulling thingy, and place it so it can pull against the frame, using it to pull the webbing nice and tight, but don't go crazy.

Then, staple it across the complete piece.
Cut the ends, leaving a couple of inches extra.

Fold the end over and staple all the way across.

It creates a nice firm support,

Do it so the webbing is evenly spaced.

Then repeat, going the other way and weaving the webbing as you go.

Next it's time for the burlap.
It's always good to have a role of burlap in your closet!!!!!
Cut a piece to fit with excess to futz around with,.
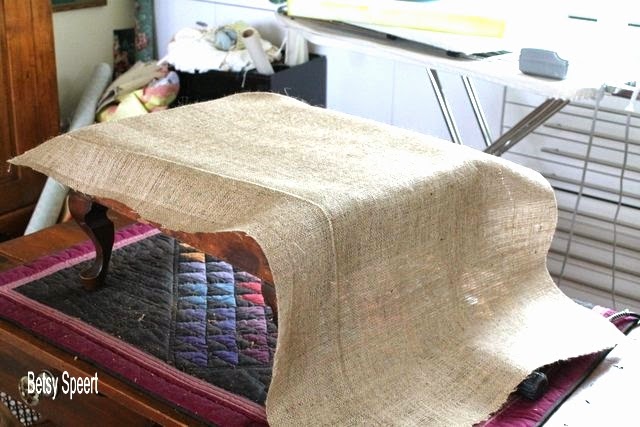
Tack it with staples in the center of each side, pulling it tight.
Then, starting from the middle, work your way out, pulling outwards on the burlap, till you get to the corners.

Like this,.
Then trim it so there is fabric left that can be folded over.

Then,
fold it over making a neat surface for the 2" foam that will go next.

See.....
nice and neat.

Then it was time to build up the frame on the shorter ottoman.
One of the advantages of going for long walks for exercise, is it's a good way to think about how to build the next project on your list.
I figured out that I would need a board cut into 4 pieces and a thin wood piece to cover the top.
I took my little footstool with me to Home Depot with the info that I needed it to be 1.5" higher and tackled a very informative and helpful guy named Terry.
Between the two of us, we found supplies that when added together came to 1.5", and then he cut the wood to my dimensions.
Sooooooo.....
I was going to take it home and screw it together.
The night before I had put my screw driver battery in the recharger so that I would be
ALL READY!!!!!
As I got into my car, ready to drive home, I realized that Drape It, the workroom I use, and whose owners are my close buddies, was not far off, actually not even too much out of my way on the drive home.
And I thought to myself.....
"Self!!!!! If I take this to Drape It, and Gilles my upholsterer guru is there.....he could screw this all together for me in 3 minutes. If I take it home to do it myself, knowing me, it will take an hour."
So I called Gilles, and he said I could "Come on over!!!!"
So I did, and it took him 2.75 minutes!!!!!

So,
here they are, the same height!!!!! ready for their 2" medium density foam.

I went to my closet to get the foam.
You should always have foam in your closet!!!!!!

I cut it to fit, using my trusty meat cutting knife from Bed Bath and Beyond.

I applied the foam to each ottoman using this adhesive spray.
You should always have 2 cans of this in your closet!!!!!

And here they are!!!!!
Ready for the next stage, which I will show in my next post.

Here's a side by side of how far I've gotten.
Very exciting.

This is enough for today.
That's it Kampers.
Go outside and go for a walk, and think up some solutions to stuff!!!!!
On that note,
Latah, Gatah

0 comments:
Post a Comment