OK Kampers.....
Let's get back to Miriam and Ross's home.
As you know, I've been working on their living room.

Behind the pair of chairs that I slipcovered is the area by the porch door that is used as an auxiliary entry hall.
I designed the space to have a pair of chairs flanking the table in front of the back window.

This way.....there is someplace to sit when putting on or pulling off their outdoor shoes.

The pair of green armchairs are the same chairs we used in the dining room.

We snagged 8 of them at auction.
I did 4 in green with white accents first.....
Now I've done the other 4 in white with green accents.
I want to mix them up in the dining room.
So, 2 green ones will be used in the living room, and 2 white ones will be used in the kitchen.
This way, when they have a large dinner party, they can pull the chairs into the dinning room, and have seating for 10, including the host and hostess chairs at the ends of the table.....
.....that I haven't gotten around to slip-covering yet......
Currently, the living room chairs still have the dining room fabric on them.
It's a simple step to switch the seats, I just pop off the seat on the green chair and put it on the white chair, putting the newly covered seat on the green chairs.
In this post, I will show you the new fabric and how to recover old chairs with a plump comfy seat.
This is what they looked like before I got my paws on them.

For someone with no padding on her @$$, they didn't work.
The first thing you want to do is to strip the old fabric and padding off the wood planks that make up the base of the seat.
In this case, the previous upholsterer had just covered over the original fabric and padding.
I do not approve!!!!!
If I can make more work for myself I will!!!!!
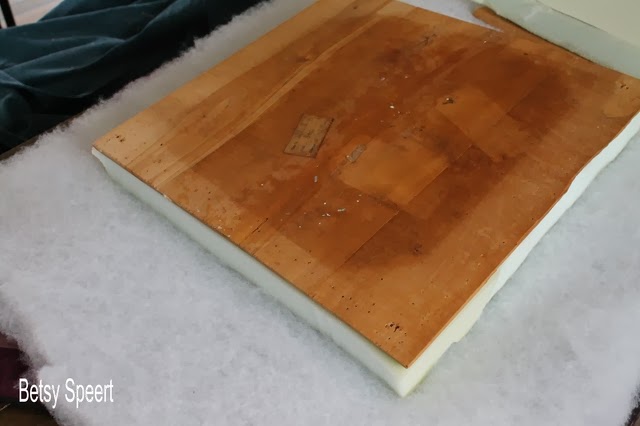
Once you have the board all naked and exposed.....
you will want to cut a piece of 2" thick medium density foam to the size of the seat.
Lay the board on the foam.....and draw an outline around the shape.

I use a sharpie marker....

Then I get out my super duper foam cutting knife....
the cheapest electric knife I could find at Bed Bath and Beyond.

And I cut the foam using the drawn lines as my guide.

Don't worry if you gouge the sides a little, it doesn't matter.

Then I applied spray adhesive to the back of the foam, and pressed it onto the wooden plank seat.

Now, it was time to wrap the Dacron.....

only I noticed that the foam had been cut too large.
Obviously, my assistant (Betsy) didn't do a very good job.
This was when I found out that I could cut the foam while glued to the wood!
The wood worked as an excellent guide.

OK, NOW it was time to wrap the Dacron.
I cut a piece to fit, allowing a lot of extra around the sides for grabbing.
You don't need this much extra Dacron, but the roll was this wide, and there was no point in ending up with scraps because I already have a garbage bag full of them.
Start by placing a staple in the middle of each side, pulling the Dacron taught as you go, using your hand to smooth it across the foam to help pull it tight.
.JPG)
Check it, to see it it's the way you want it placed.....
.JPG)
Then, working form the centers out, staple along the edges, pulling it taught as you go.
Make sure you are creating an even edge, you don't want there to be indentations along the sides.
If you see that there are some places tighter than others, simply pull out those staples and redo that part for an even pull.
.JPG)
Once you've stapled all the way around, trim the excess Dacron.
.JPG)
Then.....
once again check it that it's even.
.JPG)
.JPG)
Next, center your fabric over the seat and tack it with staples in the four middles.
.JPG)
Turn it over to check that the fabric is placed the way you want it.
This is when you still have time to fix your @#$ ups!!!!!
.JPG)
Staple it the same way you did the Dacron, starting from the center and working out from the middle of each side, using your hands to smooth the front as you go.
When you come to the corners, there are several ways you can do them.
In this case, I tried to create as uncreased and unfolded a look as possible.
I stood the seat on end, and pulled the fabric over the corner.
.JPG)
Pulled it tight....
.JPG)
Stapled it in place.....
.JPG)
Checked it.....
.JPG)
and trimmed the excess fabric.

A nice tight corner.
.JPG)
Pulling it down like that creates a lush curved crown for the seat, much gooder than the flat one that it had had!!!!!
.JPG)
For a nice finish, add a cambric dust cover for the bottom.
I reused the ones that were already on the chair.

All together now.....
tack them in the middle first, then work your way out from the center to the corners!!!!!

They create a finished look and cover the raw edges of the fabric.

Ready for the chairs!!!!!
.JPG)
Since I haven't been back to Miriam and Ross's to put the new seats on the green chairs, and I had the white ones in my basement workshop.....
I put them on the white chairs for the photo shoot!!!!!
.jpg)
.jpg)
The green chairs had numbers painted on the back that I did freehand.
These I used a stencil from Maison de Stencil.
That's much easier than designing the font and transferring the letters to the chair!!!!!
.jpg)
.jpg)
.jpg)
.jpg)

Just a little distressing in the logical places.....

Soooooo....
the two fabrics will be swapped.
As you can see the patterns are similar in color, this way the two rooms can merge and flow.

On the left is the stencil, on the right are my letters.....the number is a font I got from the Graphic's Fairy.

So, here's the before an after from the auction.

That's it fellow kampers.
Latah, Gatah

0 comments:
Post a Comment